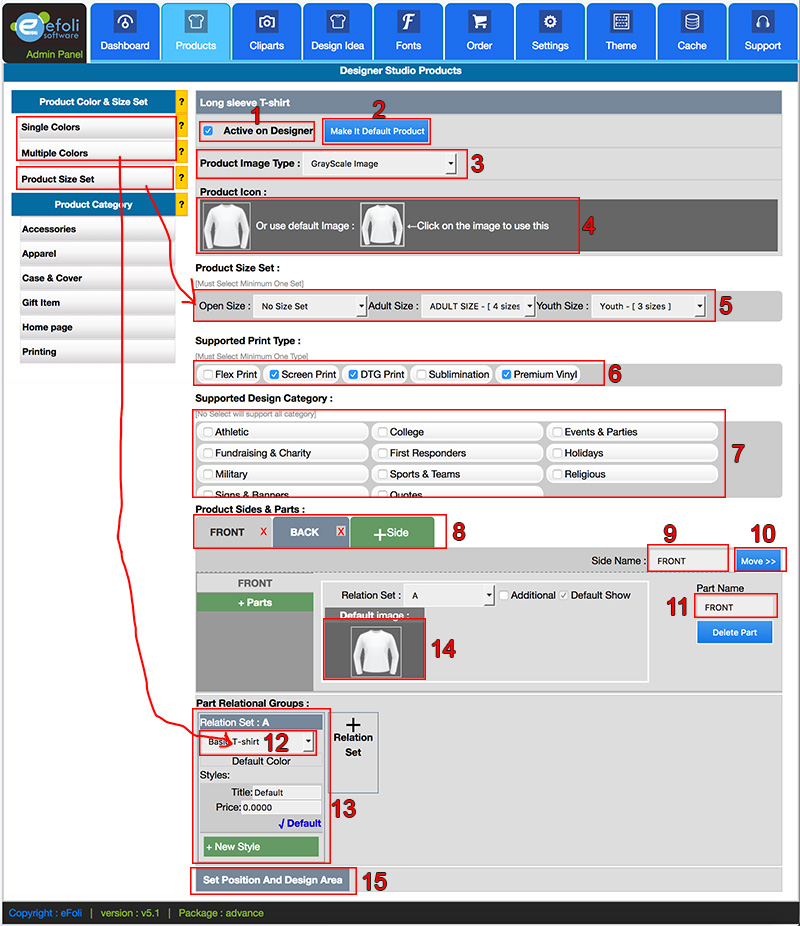
Option Details below in reference with numbers in image:
- Active on Designer
Click on this check box to activate this product as a customized product. You can check this options after complete all your settings as below. If you do not check this option, this product will be available on front-end designer for customization.
- Make it Default Product
If you want to set this product as default product when the user comes to designer directly without select a product. This will product will load by default on direct designer URL. After change default product, you have to re-generate designer cache to view it on the front end.
- Product Image Type
Here has 2 option. "Grayscale Image" and "Multicolor Image" for product image type. Select one option based on your product needs. Based on this selection you will be promoted to adding product images in later steps.
- Grayscale Image: the product color is plain color do not contain texture, models, gradients or multiple colors on the same side. Here you add single (Grayscale/White) product image per side and add rest product colors as HEX color code and the system will show the product colors based on this color code over given model image. For Ex: you have a product contains 2 print locations/sides with 20 available colors and the product color is plain color (no texture or multiple colors on product image). In this case, you will add the product image as (Grayscale/White) for the 2 print location/size (FRONT, BACK) and add only the color code under a color set. And you can use this color set while adding the product. With this method, you do not need to add much (in this case 20 product x 2 side = 40 images) images as product color image.
- Multiple Colors Image: if your product image contains models, texture, gradient, multiple colors on the same side or you want to show real product photography image while designing and changing product colors. In this case, you have to add actual product image as a color image while adding the product. The designer will load the actual image you added when the user tries to change product color.
- Product Icon
This product icon will show on designer product browser window. You can upload a new icon image here to show on the designer by clicking on the icon image on left side.
Or use product default image by clicking on right side icon image, which is you added as product image on BigCommerce product option.
- Product Size Set
Select product side set/s which sizes will be available for this product. You can select multiple product size option from available, Ex: Youth Size, Adult Size, Plus Size etc.
**You need to select at least one size option here to load the product properly on the designer.
[Help: Manage Product Size Option]
- Supported Printing Type
Select available printing type for this product. You can select multiple printing type option (based on your package) from available, Ex: Screen Print, DTG (Direct to Garment), Vinyl etc.
**You need to select at least one printing type option here to load the product properly on the designer.
Based on selected printing type, design customization pricing will be reflected for this product.
[Help: Managing Design Printing Method]
- Supported Design Category
If you have different types of product and want to restrict design idea category based on selected product, you can select the available design idea category here. If you do not select any category here all design idea category will be available for this product on the designer, while the user browses designer idea on the designer.
For Ex: You have 2 type of product T-shirt and Business card for customization. And you have design idea option on the designer. Now you need to restrict users to view business card type designs while they are creating a t-shirt and restrict t-shirt type design idea while they are creating a business card.
If you select design idea category here only those will be available on the designer when user customizing this product. Rest category will not be visible on the designer for this product.
- Product Sides
Add product sides/print location for this product like FRONT, BACK, LEFT, RIGHT etc. You can add new sides by clicking "+Side".
- Side Name
Give it a name Ex: FRONT and click outside on the input box, it will update the product side name.
- Move
Re-arrange the added sides.
- Part Name
Give it a name
- Product color set
Select the related product color set from the drop-down which colors will be available for this product, these color sets you have created from product color options as described here.
Here it will show the available color sets based on product image type you have selected in no 3 above. If you select "Grayscale image" type, it will show color sets under "Single Colors". And if you select Multicolor image" then it will show available color from "Multiple Colors".
After selecting the product color set, mouse over "Default Color" text just below dropdown to see the colors containing under selected color set. Select the default color for this product when using color for this product.
- Part Relation Groups
By default it will be a relation added, for this type of simple product you do not need to worry about this option. Just Select the color option as described in number 14.
- Product Image
Click on image icon and browse the product image for selected side to upload.
If you select Grayscale type image in the earlier step, you need to upload single white/grayscale image per side here.
Image size must be within 520x520px and image type transparent PNG
For Multicolor image type: Here it will show product image upload option based on the number of colors available on selected color set. Ex: you have selected color set named "Reglan T-shirt", which contain 8 colors as you added. In this case, it will show 8 image uploader per side, with color names. You can upload the product color images by clicking on the image icons under color names.
You can upload any photographic image at size 520x520px
- Set Position and Design Area
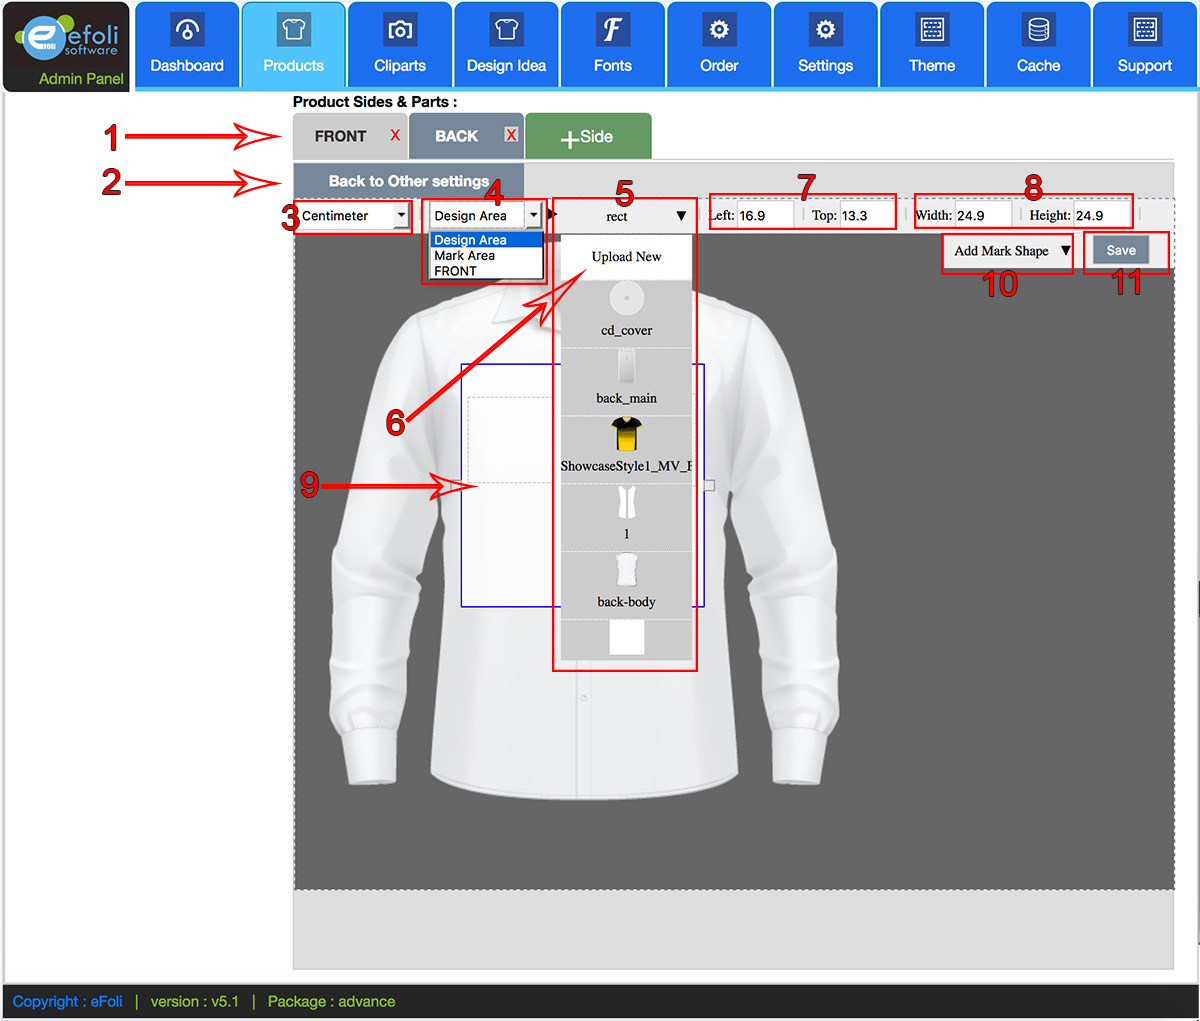
After complete the settings click on "Set Position and Design Area" on the bottom. It will load design area settings studio. See below.
|


